Saturday, 27 May 2017

Happy Birthday Katie

Hi there, thanks for popping in. Today is my daughter's 19th birthday so I decided to make a couple of things on my Scan n Cut especially for her big day.
I have to say I love my Scan N Cut and makes crafting sooo much easier.


I cut these fab shoes from Card Shapes vol 2  Tattered Lace USB and glued them onto a base that I also made on the SnC. I sponged silver paint over the shoes and covered the base in molding paste before painting with black gesso and dry brushing silver and gold acrylic paint over the top.


This rocker card is courtesy of Card Shapes vol 1 Tattered Lace USB and the bag, lipstick and nail varnish came from the Glitz and Glam USB.

Thanks for popping in and hope you all have a fab Bank Holiday weekend.

Julie xx

Monday, 15 May 2017

Magical Landscapes

Hello again, two cards to show you that I created for Lesley's Fairy television show that was recently on Hochanda. Both cards have been created with the Magical Landscapes set.


If you want to find out how I created them then please pop over to the Design Team blog, where you will find all of the details.


Thanks for stopping by

Julie xx

Quick Cards

Hello! Thanks for popping in. I have a quick 15 minute card to show you today that I created with Chocolate Baroque's May Fairy stamp set. 


For this card I started by stamping the card base with the tall decorative flower. Stamp the design at 12, 3, 6 and 9 o'clock positions first and then fill in between. It needs no measuring or stamp positioner. Next you need to take the little butterfly and stamp around the edges. Once the stamping is done, get a wet wipe and apply dabs of Cracked Pistachio  Distress ink to the background and then edge with Mustard Seed Distress ink. Finish off the design with a die cut circle, placed in the centre, that has been stamped with the little butterfly design.

If you need a quick card idea then there is plenty more inspiration over on the Chocolate Baroque Design Team blog today so be sure to take a look.

Thanks for taking a peek

Julie xx

Saturday, 6 May 2017

Birthday Shoes

Hello lovely peeps. The card I have today was made for a friend's birthday and didn't take too long to make at all.


The shoe is a Tattered Lace design and was cut on my Scan N Cut. The sentiment is also courtesy of my Scan N Cut and is one that is already in the machine's memory. The coloured scroll design is from Clarity and was inked with Distress Oxides and the corners were stamped with designs I have in my stash that I no longer have any idea where they came from so apologises.

I finished the card off with a few flat backed gems and that is pretty much it.

Thanks for stopping by and hope you have a fab weekend

Julie xx

Tuesday, 2 May 2017

All Things Russian

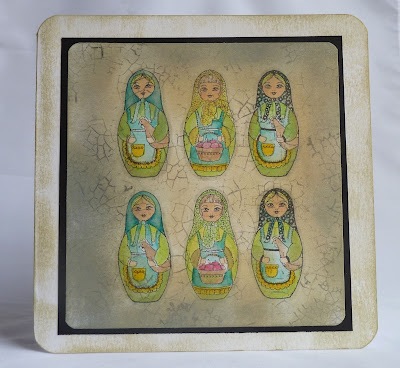
Hi, thanks for popping in. Just playing catch up with my blog posts and thought I would share these two cards that were recently shown on Lesley's Hochanda Shows where she did some fab demos with the Babushka stamps and the Silhouette Palace stencils...did you get to see it? 


This first card is created with the 3 smallest Babuska dolls, coloured with Brush Markers and the background is coloured with Antique Linen and Hickory Smoke Distress inks. I inked up the large Crackle Background stamp with grey Versafine and stamped all over the card to create an aged effect, before mounting onto black card and attaching to the card base.


This card is created with the Silhouette Palace mask and stencil. It was really easy to create. Start by placing the Palace mask onto water colour card. Mask off the bottom half of the card, add a moon with Distress ink and then mask that off before spritzing with your inks. Whatever colours you want but I have used red, orange, yellow and grey spray inks.Remove the mask and leave to dry. Next you will need to turn the mask around and place it underneath your design so that it is a reflection. Using Cut N Dry foam go around the stencil with Hickory Smoke Distress ink. Remove the mask and then add in water ripples with Hickory Smoke Distress ink and a white paint pen. Place the palace stencil over the main image and go in with Distress ink so that you can add shadow.

Thanks for popping by

Julie xx