Saturday 29 December 2018

Floral Delights To Bring In the New Year

Hello, here is a selection of cards I made for a recent Chocolate Baroque show on Hochanda TV.


My first card is using the Floral Grunge stamp which was stamped onto My Floral Soul designer papers and then coloured with polychromus pencils.


Wild Meadow and Distress inks were used to create my second card.


Floral Grunge and my favourite stamp of this Chocolate Baroque stamp release was used in my third and final card.

Thanks for popping in and Happy New Year to you

Julie xx

Tuesday 4 December 2018

Butterflies


Hello, thanks for popping in. Sorry I haven't been posting much lately, but I have two butterfly themed cards.

Both of these cards are made using Chocolate Baroque stamps. They can be brought separately or in a group of four here   

Thanks for looking

Julie xx

Thursday 25 October 2018

Kim Moody's Quirky House Collection

Hello, thanks for popping in. Today I have some cards that I have made with Kim Moody's new stamp collection that is available from Chocolate Baroque. 


Just in time for Halloween, I themed this design (Loft Conversion) with a spooky feel, but you can use it for any theme you wish.


This card is stamped with the English Country Garden house, so I decided to keep to the title and create a summery feel card, with holly-hock style flowers stamped in the foreground.


I decided that la Maison would be a good style for a New Home card. The letters were cut on my fabulous Scan n Cut machine and the rest of the card was coloured with pencils.


I used Loft Conversion for this summery feel card. As you can see it is very versatile as my first card shows it as a spooky Halloween house.


My last card for these samples is made with La Maison which I coloured with polychromus pencils and Distress inks.

Thanks for taking a peek. There are more Kim Moody designs on the Design Team blog, so why don't you click here and take a look.

Julie xx

Monday 24 September 2018

Indian Textiles

Hello, just a quick post to show a couple of cards made with Chocolate Baroques Indian inspired stamp sets.


My first card is a very quick card. I inked up the larger decorative stamp from Indian Textiles with Crimson Versafine ink and stamped 5 designs on the DL card in landscape style. I then filled in the gaps with the smaller design from the same set. The sentiment is from Paisley Elephant, which I stamped onto spare card, cut out and then mounted onto the finished card.


My second card has been stamped with Indian Elephant and Indian Textile and despite it looking quite layered this is all one piece of card. I used sticky notes to mask areas off to create the layered look and coloured with pencils and Distress inks.

Thanks for stopping by

Julie xx

Sunday 9 September 2018

Nature's Paisley

Hello, thanks for popping in. The cards I have on the blog today have been designed using the Scan n Cut. The grid design is a set template in the machine so even easier...


The first card was stamped with Nature's Paisley from Chocolate Baroque. I stamped the leafy design onto the yellow and orange card-stock squares and then arranged them in a grid design. The decorative leaf was stamped and embossed, twice in black and once in gold, before cutting out and arranging onto the card with garden string and a button from my stash.


The second card is stamped with Paisley Elephant from Chocolate Baroque. The yellow template was cut on the scan n cut and placed over the stamped paisley background. The elephant was stamped and then coloured with pencils before being cut out and attached to the front with 3d glue gel.

Thanks for stopping by

Julie xx

Tuesday 28 August 2018

Little Spruce Robin

Hello. Hope you are well. I cannot believe we are at the end of August already...Christmas really is fast approaching!


These two Christmas cards have been stamped with Chocolate Baroque's Robin The Spruce. I love this stamp set as the foliage is so useful and can be used on practically all of your Christmas card makes. As you can see, on my first card I have stamped the foliage around the edge of the base card. The little robin silhouette was stamped onto separate card-stock before being cut out with a circle die. I used a smaller circle aperture to create the sun/moon and everything has been lightly coloured with pale blues and oranges to give a very delicate feel of colour.


My second card is just one layer. I coloured the tree branch stamp with green and brown water-colour pens straight onto the rubber, before stamping onto the cards-stock and then stamped the berry branch in a very dark green dye ink.
The robin scene stamp was inked up with Sepia Versafine, stamped and then coloured with Polychromus pencils and then finished off by outlining with glitter glue.

Thanks for stopping by

Julie xx

Sunday 12 August 2018

What a lovely Pear

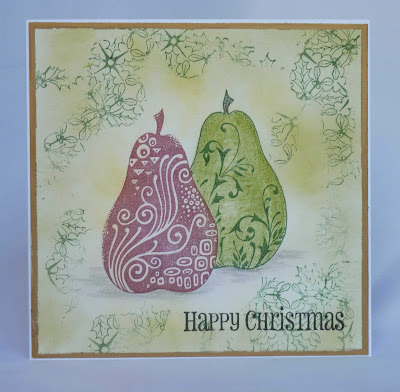
Hello, thanks for popping in. This Christmas card was stamped with Pears and Baubles from Chocolate Baroque.


I inked up the solid pear design with red dye based ink first and stamped onto white stamping card and also onto copy paper to create a mask. Cut out and place the mask over the stamping card design so that the green Pear can be stamped next to the first red pear, but just slightly to the back and overlapping.
Remove the mask and colour the background with Distress ink. I inked up the large background stamp from Pear and Baubles but didn't use it with a mount. I just dabbed the stamp onto the card with my fingers so that you get just bits of the design. This is my new favourite way of using large stamps for backgrounds.
I edged the base card with a gold marker pen, before cutting the stamped design to size and attaching to the front of the card.

Thanks for stopping by

Julie xx

Tuesday 31 July 2018

Scrumptious Succulents

Hello. I have three cards all made with Scrumptious Succulents  from Chocolate baroque.


The background on the first card was stamped with clear embossing ink and then coloured with pink and purple pan pastels, dusted over the top so that the powder adheres to the clear embossing ink. The main image was stamped onto white card-stock, coloured with water-colour and then attached to the front of the card.


I love simple Kraft Card designs so this is what I have done for the last two cards. The images have simply been stamped with onyx black Versafine ink and then coloured with Polychromos pencils. 

Thank you for stopping by

Julie xx

Tuesday 17 July 2018

Quick Card

Hello, today is a quick card stamped with the Blossom and Grow set from Chocolate Baroque.


Super simple, stamp image with Onyx Black Versafine, colour with Polychromos Pencils and then colour the background with Distress inks using cut n dry foam. Cut image to size, mount onto green card-stock and attach to the front of the card.

Thanks for popping in

Julie xx

Tuesday 3 July 2018

Simply Embossed

Hello, today I have a quick card made from a recently released stamp set from Chocolate Baroque called Lords and Ladies


I inked up the spray of ferns and clovers with clear embossing ink and stamped onto black card. I then sprinkled with silver embossing powder and then set with a heat gun. I edged my card with a silver paint pen and added white and silver paint pen dots in the background. I then mounted the panel onto a DL card blank.

Thanks for stopping by

Julie xx

Thursday 31 May 2018

The Rose Tree

Hello, today I have a card that I have stamped using the The Rose Tree set from Chocolate Baroque


The dandelion seeds and seed heads have been stamped in the background with Versamark and Pan Pastel dusted over the top to pick up the image. The main floral design was stamped with Onyx Black Versafine and then coloured with Colour Soft Pencils. I then cut the panel out and attached to the base card with double sided tape.

Thank you for stopping by
Julie xx

Tuesday 15 May 2018

Quick Cards

Hello, here are two super quick card ideas for you. Both are made using the lovely Rose Tree set from Chocolate Baroque. If you would like more quick card ideas then pop over to Chocolate Baroque's  Design Team blog where there are lots more ideas being featured 


As you can see my first card is very easy. I have just stamped the bee and butterfly onto card, coloured with pencils, mounted onto black card-stock before attaching to the DL card blank.
The sentiment is from Birthday Words.


For my second card I have applied Barn Door Distress ink through a decorative panel stencil. I added some grey pencil shading for depth, along with white paint pen highlights. I then stamped the flower spray with Onyx Black Versafine ink onto the panel and added black and white pen dots for interest. The card was finished off with a fine liner pen border and flat back gems.

Thanks for stopping by

Julie xx

Monday 14 May 2018

Summer Breeze

Hello, thanks for stopping by. I have a card made with Rose Tree from Chocolate Baroque to show you today.


I started by stamping the dandelion seeds around the edge of my card base to form a border. I masked off the centre of the card before colouring the border with Picked Raspberry Distress ink.
I then reversed the masking so that I could stamp and colour the centre of the card. I spritzed the Distress ink with water to create the mottled background and finished off with flat back gems and dabs of Crystal Stickles to add a bit of sparkle to the dandelions and bee's wings.

Thanks for taking a peek at my blog

Julie xx 

Saturday 28 April 2018

Wisteria Lane


Hello, thanks for popping in. 
Here is a card made with Chocolate Baroque's Wisteria Lane


I inked up the decorative flower with Onyx Black Versafine ink and stamped using a clock face as a guide, meaning I stamped at 12, 3, 6 and then 9 o'clock first so that it was easier to fill in the gaps. I stamped the swirly flower around the edge of the decorative panel and the card blank, using grey Versafine ink and then darkened on the decorative panel with Hickory Smoke Distress ink. The flower design was coloured with pencils and the background on the decorative panel and card blank were  coloured with Distress inks.

Thanks for taking a peek

Julie xx

Sunday 15 April 2018

Quick Card

Hiya! Here is a very quick post showing a very quick card...


I stamped the Iris from Tranquility twice before colouring with Polychromos pencils and dusting the background with Broken China Distress ink. I then drew a border around each flower with a black fine liner pen and finished the design off with a sentiment from Birthday Words.

If you need more quick card ideas then get yourself over to Chocolate Baroque's blog as there is a special post today covering such ideas.

Thanks for looking

Julie xx


Wednesday 11 April 2018

Tranquility

Hello, just popping in to show a card made with Chocolate Baroque's Tranquility set.


The main image was stamped and coloured with water-colour pen onto water-colour card and the Wisteria type flower was stamped with a dark green Versafine ink.
I then cut the design to size and mounted onto black card before attaching to the DL card blank.

Thanks for taking a peek

Julie xx

Tuesday 27 March 2018

Landscape Edges


Hello, I just noticed these cards lurking in an old folder that I made with Landscape Edges. They are a couple of years old now and I believe they have already appeared on Chocolate Baroque's Design Team blog, however they have never been seen on mine, so here they are.


For the first card I coloured the stamp with different coloured marker pens before stamping onto the card, then layering onto a faux wood effect background, created by dragging a Distress ink pad across the card-stock.


I used the stone wall to frame the card, which I coloured with water colour before stamping the tree image. I also stamped the trees onto separate card-stock before die cutting with a circle and adding it as a spot light to the main image.

Thanks for popping by

Julie xx

Thursday 15 March 2018

Quick Card

Hello, if you are needing to make a card in a hurry then here is an idea and it takes just 15 minutes.


Although three separate stamp sets are used, it is still a very simple card. 
First of all ink up the large leaf design with green Versafine, from Take it or Leaf it and stamp it 5 times onto your base card. (re-ink after each application) Then take the largest tree from English Cottages and stamp in the bottom left and bottom right corners. Colour with pencils.
On separate stamping card stamp the windmill from Sunburst Scenes, cut out, add a black mount slightly bigger than your windmill design and then adhere to the front of the card.

If you would like some more quick card ideas then pop over to Chocolate Baroque's Design Team blog where there is plenty to whet your appetite 

Thanks for stopping by

Julie xx

Sunday 11 March 2018

Village Church


Hello, thanks for stopping by. I have a scene building card stamped with Sunburst Scenes and Village Life from Chocolate Baroque.

I started the design by stamping the church from Village life and then created a mask to cover the church so that when I repeatedly stamped the tree, also from Village Life, it looks like the trees are behind the church.
The sun and clouds is made up of two stamps from Sunburst Scenes.
The finished design was coloured with pencils and to finish off I added white paint pen high-lights to the trees.

Thanks for popping in

Julie

Thursday 1 March 2018

Colouring Pages

Hello, thanks for popping in. I have a couple of the recently launched colouring pages from Chocolate Baroque.


Both of these pages have been coloured with Coloursoft pencils before I went over the colouring with blending solution and then polished with a tissue. The paper the designs are printed on is fantastic as it is really smooth and robust as it takes all sorts of mediums such as alcohol ink, paints and Gesso.


Thanks for taking a peek

Julie xx

Thursday 15 February 2018

Wish Flower


Hello, just popping in to share a quick Chocolate Baroque card project that was shown on one of their recent Hochanda TV shows


I stamped the large Wish Flower design and coloured with pencils. I also made a second image onto spare card and cut out the two largest flower heads.
Once you have your main image place the negative Kaleidoscope of Butterflies mask onto your design and apply orange Distress ink so the butterfly appears over the wording and over the flowers. Don't worry that you have covered over the flowers as that is why you have cut out the two flower heads from your spare card. 
Once you are happy with your background, which I coloured with Distress inks and black water-colour splats, glue the flower heads into place with 3d glue gel.

Thanks for taking a peek

Julie xx

Sunday 11 February 2018

Reason For Lack of Posting...sorry!

Oh dear...really neglected blog. Apologies to anyone expecting a post but for the past two weeks my attention has been turned to a new blog and Facebook page that I have had to set up. Yes I did say had to! Some of you may know that my Collie had a terrible accident last July. The clip on his lead released him into a lorry and he suffered catastrophic injuries resulting in him being permanently disabled. Company of Animals who manufacture the double ended, HALTI training lead that we were using are being very unhelpful. They are washing their hands of any responsibility so I had to set up a Facebook page to gather other dog owners stories to help build my case against them. Well it has been quite successful, I have had plenty of lovely people leave messages of their experiences with HALTI lead products. If you are interested my blog page is https://haltileadmalfunction.blogspot.co.uk/  however all the comments and evidence is on https://m.facebook.com/Haltileadmalfunction/

Normal blog posts will resume later this week


Sunday 14 January 2018

Key To My Dreams

Hiya. Today I have another project created with one of Mark Gould's latest stamps, Gypsy Rose


I love this image and decided to pair it up with Chocolate Baroque's Key To My Dreams.
 Gypsy Rose was inked up with Onyx Black Versafine ink and stamped onto water-colour card. An extra image needs to be stamped onto copy paper and cut out so that Gypsy Rose can be masked. Stamp the locks and key over the mask, using grey Versafine ink  and then remove the mask and colour design with water-colour. The locks and key have been coloured with a soft graphite drawing pencil. I also used the same pencil to create the soft grey background around the edge of the card and simply smudged it with my finger and a tissue.
I added dots of acrylic paint around the image and finished off by stamping the sentiment with the Onyx Black Versafine.

Thanks for stopping by

Julie xx

Friday 5 January 2018

Travelling Through The Ages

Hello, thanks for popping in. My first post of the year is an extra large card featuring stamps from Chocolate Baroque and Mark Gould.


I started by stamping the aviatior lady on a piece of A4 water-colour card and coloured her with water-colour paints. The surrounding images are from Chocolate Baroque's Steampunkery and Steampunk Travel, which I also coloured with water-colour paints as before. The background is a mixture of water-colour and Distress inks and then finished off with white paint pen highlights.
This is a non standard sized card so I needed a piece of A3 card cut to size to matt my design.