Thursday 29 December 2016

Butterfly Dreams


Hello, thanks for popping in, hope you all had an enjoyable Christmas. Today I have two Clean And Simple cards created with the Butterfly Dreams set. They are being featured on the Design Team blog along with some of my other Teamies fantastic creations so why don't you hop over and have a look.


The Butterfly Dreams  set is beautiful and the detail in the stamp means that you don't have to spend time colouring if you don't want to. These two cards really are so simple and super quick, if you need a card in a hurry this really is the go to set.


I have just inked up the stamps with two different inks ( Majestic Blue and Spanish Moss Versafine) and simply stamped onto the card...I don't think any other explanation is needed as its that easy lol!

Thanks for stopping by and hope to see you in the New Year.

Happy New Year

Julie xx

Thursday 22 December 2016

Merry Christmas

Hello, thanks for popping in. This is a super quick Christmas card that I made using a Poinsettia stamp that I have had for years which I think came from Hobby Art and the snowy background is a clear stamp that came with one of the Christmas Creative Stamping magazine.


I started by die cutting a circle and used it as a mask so that I could apply Picket Fence Distress ink around its edge. I then removed the mask and then stamped and coloured the Poinsettia and then stamped the snowy background stamp around the edge of the circle. I finished the card off with some Merry Christmas washi tape. 
This card was really quick to make so was great for last minute cards.

I hope you all have a very happy Christmas and best wishes for a fantastic New Year.

Thanks for stopping by

Julie xx

Wednesday 21 December 2016

Challenge 30

  • Hi! Today marks the start of a brand new colour challenge over on Chocolate Baroque's Challenge Blog


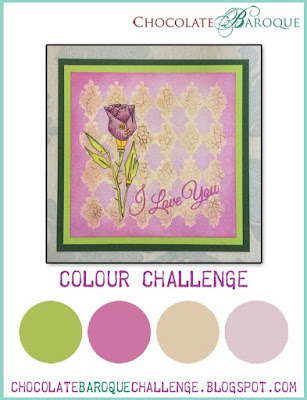
Here is my card made with the new Challenge colours along with using the rather fab Diamante Delights stamp set. I inked up the little thistle design with the darker pink ink and stamped all around the outside edge of the card. I then over stamped it with the lighter pink colour. 
I applied Shabby Shutters Distress ink in the centre of the card and used the edge of a piece of card as a guide to create the straight edge design. I then stamped one of the larger flower designs onto water-colour card and water coloured with brush-markers, then cut it out and mounted onto the base card with foam pads.


Thanks for stopping by

Julie xx

Sunday 11 December 2016

Baroque Bracelet With Matching Gift Box

Hi, thanks for popping by. Today I am sharing a bracelet I made from a wooden lolly stick and a matching gift box.


I stamped directly onto the lolly stick (or tongue depressor) with the Baroque Orchid stamp that I had inked with green Staz-on. Next you need to place your stamped sticks into boiling water for 5 to 10 minutes and then turn the heat off and leave them to soak for a further 30 minutes. Remove the sticks and bend them into shape. Place them into a jar, or something similar to hold their shape as they need to dry for about 24 hours.
When dried, punch a hole in each end of the lolly stick with a crop-o-dile, apply gold gilding wax to the edges and then cover the entire bracelet with a coat of acrylic wax. Once dry, thread some beads onto cord and attach to the bracelet by threading through your pre punched holes and tie securely.

The box has been coloured with Distress inks and stamped with the Baroque Orchid which I had inked with green Staz-on as before. Once dry, assemble the box, apply gold gilding wax to the edges and finish off with some ribbon. I cut this box on my Scan N Cut, but you can easily make a two piece box that you created on a score board.

Thanks for looking

Julie xx

Saturday 3 December 2016

Faux Candles


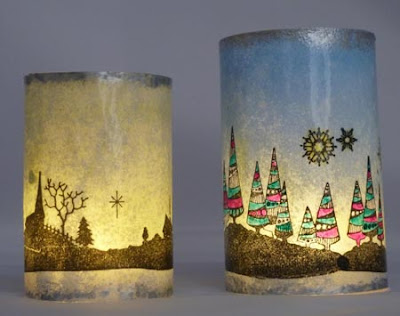
Hello, Christmas is fast approaching so if you need a quick handmade decoration here is an idea that doesn't take very long to make. It is made with Chocolate Baroque's Winter Edges.


So the first picture shows the candles without being lit and the second with an added tea light.
Stamp your chosen design along the bottom of a piece of copier paper using Onyx Black Versafine and cut to the desired height of your candle. The trees have been coloured with brush markers and I used Pan pastels in blues, greys and yellows for the backgrounds. Remove excess Panpastel with a tissue before covering with Versafine ink, or any other clear embossing ink, before then adding clear embossing powder and heating with a heat gun. If you haven't got a nice smooth finish then repeat the embossing process for a second time.


Cut a piece of acetate to the same size as your copier paper, fold the cut acetate to form a cylinder and staple into place. Wrap your candle design around the acetate and secure with double sided tape. Finish the edges of the candle with silver Distress paint and then place over a lit battery operated tea light.

Thanks for popping in and hope to see you again soon

Julie xx


Wednesday 30 November 2016

Walled Garden


Hello, me again. Just a quick post to share another couple of cards that have appeared on Chocolate Baroque's Design Team blog.


My first card is created with the Walled Garden cling stamp. I simply stamped the image with Black Onyx Vesafine and then water coloured with brush markers. There is a little bonus tree stamp that comes with this design, so I stamped it through the archway so it looks like the path leads to another garden.


This card has been created with Another Brick in the Walled Garden and as before I water coloured with brush markers. I decided to reflect the wall element of the design and mounted the image onto a stencilled wall. There is a little bonus foliage stamp that comes with this stamp, so I added it around the stencilled wall and finished off with dabs of Crystal Stickles.

Thursday 24 November 2016

Autumn Heart


Hello. I have a cute little tag made with Chocolate Baroque's Woodland Edges to show you today.


I coloured the tag with Distress inks before stamping the solid row of leaves 3 or 4 times on a slight angle. Next I cut a heart and it's shadow on the Scan n Cut before stamping the heart with the naked, winter tree. The heart topper was coloured with Distress inks and finished off with white pen highlights.
3 little die cut leaves were added with 3D foam and I finished the tag off with some beaded string, tied in a bow.

Thanks for stopping by.

Julie xx

Wednesday 23 November 2016

Chocolate Baroque Challenge 29

Hi there, it is week 2 over on the Chocolate Baroque Challenge blog, so why don't you enter, still plenty of time and there is a chance of a prize as always.


As you can see the Challenge colours have been kept very Autumnal, so I decided to go with a simple leaf design taken from the Butterfly Dreams set. I coloured directly onto the stamp with brush markers and pressed onto the card. I started by making a border around the edge of the card and then moved to the centre to fill in a smaller square area. Once the leaves were all stamped I added touches of Old Paper and Walnut Stain Distress ink before mounting the sentiment and adding it to the centre of the card.


Thanks for stopping by. Hope to see you again soon.

Julie xx

Friday 18 November 2016

Butterfly Frame

Hello there! I have neglected my poor blog for a while but have decided to start posting my Chocolate Baroque Design Team projects. Usually I just post them on the Design Team blog, however I have had a look through some of my projects and thought they would brighten up my little ole blog...lol


I made this frame over a year ago, but it's a really quick and easy present idea. The picture frame was painted with Gesso and then dry brushed with cerise pink acrylic paint. The main image is a background stamp from Chocolate Baroque that I have stamped 4 times to build up a bigger design. The butterflies are again CB stamps that I coloured with Peacock Feather and Picked Raspberry Distress ink and added a glittered flame around the edge.

Thanks for popping in

Julie xx

Thursday 17 November 2016

Autumn

Hello, just a quick post to share a card I recently posted on Chocolate Baroque's blog.


The card is stamped with the Fantasy Woodland set, which is becoming one of my all time favourites from CB. The centre tree was stamped with brush markers painted directly onto the stamp and the leaves around the design were stamped with Distress ink, along with the swirly detail, which is actually another tree from the same set.

Thanks for stopping by

Julie xx

Wednesday 16 November 2016

Gelli Art


Hello, thanks for popping in. Thought I would add a post to show what I made in a fantastic workshop with John Bloodworth. I spent a really lovely day at The Mulberry Bush in Thatcham, at the weekend playing with lots of paints, stamps and stencils along with the fabulous Gelli Plate.


I have been the owner of a Gelli Plate for quite a long time, however I have never really used it properly, so I was so pleased when I found out that John's workshop would be all about the Gelli Plate. For those of you that don't know, John Bloodworth (aka Gentleman Crafter) is spending a full year travelling the country in his camper van, running workshops, all for charity. The charity he is working for is Mind and it does brilliant work helping people affected with mental illness.
You can catch up with all of John's work, here


I met some lovely ladies on Saturday and we all had great fun getting to grips with the Gelli Plate. We spent the morning creating loads of background papers, before assembling our MDF boxes. Then after lunch we set about covering them in the Gelli designs that we had created.
Really pleased with how my boxes turned out. Can't wait to have another play.

Thanks for stopping by

Julie xx

Wednesday 26 October 2016

Colour Challenge 28


Hello and thanks for stopping by. Today marks the start of the second week for Challenge 28 over on Chocolate Baroque's Challenge Blog

The card I have created uses the fantastic Sketchy Doodles Landscape stamp set. The main image was stamped onto water-colour card, before being water-coloured with brush markers.I cut a frame from blue card on my Scan n Cut and over stamped with the fancy corner and stylised roses.
As you can see the base card has been stamped with the roses and corner, coloured with brush-markers and and then Antique Linen Distress ink applied to blend it altogether.


Thanks for popping in and hope to see you again soon.

Julie xx

Tuesday 11 October 2016

Recycled Photo Frame

Hi lovely people, thanks for popping in. This piece of home decor started out as an old photo frame, but I stamped onto a selection of Tando twinchies and inchies and glued them to the front of the frame, to try and transform the tatty frame into something a bit more special.


The heart in the centre is ultra think embossing enamel. I placed a metal heart cookie cutter over a Chocolate Baroque stamp and poured in the molten utee. Let it set for a few minutes and you have yourself a handmade embellishment. The stamp sets used are Gothic Fragments and Mini Scripts

Thanks for looking.

Julie xx

Wednesday 5 October 2016

Colour Challenge 27

Hello, today marks the start of week 3 over on Chocolate Baroque's Challenge Blog


This is the card I made, taking the large bloom from the Sketchey Doodle flower stamp set and mounting on top of a stencilled background. I used a selection of blue Distress inks and the pale blue/green came from a Juniper coloured, Adirondack ink pad.


Thanks for popping in, it's much appreciated

Julie xx


Monday 19 September 2016

Bumper Seaside Post

Hello. Thanks for stopping by. Today I have a few cards that I made for Lesley's Seaside show that was shown on the Craft Channel over the weekend. If you missed it you can catch up on line here


My first card is stamped with the lovely Mermaid Queen set and water-coloured with brush markers. The shell was stamped onto polymer clay and coloured with the brush markers. I made a hole at the bottom of the shell with a Crop-a-dile so that I could add a jump ring and beads.


Ok, my second card was stamped with Seaside Dreams and Mermaid Queen and water-coloured with brush markers. For added texture I applied a thick white Gesso around the edges before mounting onto the base card. The little mermaid silhouette was reversed to create the opposite facing duo and the sentiment was die cut and mounted onto the card with 3d glue gel.


These last two were made with the Seaside Dreams and have already featured on Chocolate Baroque's Design Team blog. If you want to find out more about them you can click here for the masked shell card and here for the beach huts.


Thanks for popping in.

Julie xx

Wednesday 17 August 2016

Colour Challenge 26

Hello and thanks for popping in. Today marks the start of a brand new Colour Challenge over at Chocolate Baroque's Challenge Blog. Here are the fab colours that have been chosen...


This is the card I have made using this month's challenge colours...


I have chosen stamps from Punky Hearts and Fluttering Hearts and decided to create a fairly clean and simple card. I stamped the butterfly heart twice onto spare card and coloured with Distress inks. I cut out the main image along with the butterfly and the little flower of the second image so that I could use these as decoupage. 
I stamped the heart pendulum onto the base card and then stencilled the dots with Distress ink before gluing the stamped images into place and then finished off with dabs of Crystal Stickles.

Thanks for stopping by and hope to see you again soon

Wednesday 3 August 2016

Colour Challenge 25

Hello. Today marks the start of week 3 over on Chocolate Baroque's Challenge blog. We are also celebrating the blog's 2nd Anniversary so get your entry in as there is an extra special prize up for grabs.


The theme this month is all things CHOCOLATE!! Yay who doesn't like chocolate? 
The stamp set I have used is Fresh Blooms and as you can see I have kept the design quite simple.
The flower and leaves have been stamped onto Kraft card and embossed in white, then coloured with Polychromos pencils. The background is a Tim Holtz, wood design embossing folder, that I have coloured with Old Paper distress ink and matted onto Kraft card that has been coloured with Walnut Distress ink. Of course I had to finish off with dabs of Crystal Stickles and there you have it, one chocolate inspired card.

Many thanks for taking a peek. Please call back again.

Julie xx

Tuesday 2 August 2016

Birthday Double

Hi blog peeps. What can I say, only one blog post for the whole of July...hmmm. Must try harder. The crafting doesn't seem to be the problem, but taking photos and uploading to my little ole blog is woeful.
Anyway, here are a couple of quick cards that I made back in June for my friend and her daughter.


This sunflower card was made with an old favourite stamp that I have had in my stash for years. I think it is a DO craft design, but when it is layered up it creates quite a realistic looking flower. I have coloured with brush markers and the leaves have been cut on the Scan N Cut. The corner stamp and sentiment are from Chocolate Baraoque.


This 18th card was cut entirely on the Scan n Cut, stamped and coloured with Pan Pastel. Nothing much more to add, it really was that easy.

Thanks for stopping by and please call back soon...think I can already predict that there will be a post again tomorrow ha ha!

Julie xx

Saturday 23 July 2016

Floral Backgrounds

Hi there, hope it's as sunny with you as it is here today. First of all apologises for lack of posts, obviously I must try harder, but a big thank you for popping in today.


My first card is made with the really beautiful Harlequin Bouquet, which I have stamped and watercoloured with brush markers. I cut the design with an oval die and edged with Distress inks and Crystal Stickles. I mounted the oval onto a stamped background that I created with the Harlequin Fragment and Distress inks.


This card has been stamped with the Flora Musica cling stamp and then water coloured with brush markers. As before I have cut with an oval die, edged with Distress ink and applied Crystal Stickles to the outer edge. I then mounted it onto the base card that I had stencilled with a musical note Tando Creative Mask.


And last but not least the Crackling Rose which I made in a similar way to the previous two. I added extra crackles around the base card using the cracked egg stamp from the clear Natural Eggs set.

Enjoy the sunshine!

Julie xx

Friday 24 June 2016

Bumper Clean and Simple Post

Hello. Thanks for popping in. Thought I would do a post to share my CAS cards in one large post. Chocolate Baroque have a twice monthly slot to show 15 minute card ideas and here are mine that have all previously featured 


This card is made with Punky Flowers and the sentiment is from one of the clear word sets. I doodled the squiggly lines and stamped the flower and sentiment with Onyx Black Versafine ink. Using a sticky note, I created a mask so that I could define where I wanted to apply the Distress inks and make it look like it is blasting out of the flower.


Another Punk Flowers stamp used over stencilled card. Cut out and layered onto black card.


Dotty stencil placed directly onto the base card and then the sentiment and Punky Flowers stamped over the top.


Here is a selection of Thank you notes that I made with the large flower head stamps. There are six in total and you can buy them as a set or individually. 
I needed to make quite a lot of cards so the design had to be quick and simple so I decided to use the 4 inch Gelli Plate for a quick background stamp.
I covered the Gelli Plate with Distress ink, before applying it to the card stock, then stamped my chosen Flower Head over the top, before adding a touch of colour with Inktense pencils.


Wednesday 15 June 2016

18th Birthdays

Hi there....Oh dear my blog has been badly neglected, so two posts in two days is a record! I thought I would share the cards I made for my daughter and her friend who both turned 18 recently.


This first card is made with Sheena Douglass stamps and dies. I stamped and masked one of the skulls before stamping and masking the flowers onto glossy card. Once stamped I coloured with brush markers and then added the second stamped and die cut skull. I decided to add flat back gems around the eye sockets and decorated with the stamps that came in the set to create a traditional sugar skull.


The second card was made for my daughter on my trusty Scan n Cut. The last project it made before being traded in for the newest CM900 model...yay!

I welded hearts, flowers and leaves into a heart shape base and also cut out separate hearts and flowers so that they could be decoupaged onto the base. The 18 was cut and glittered and the background was stamped in pink with various swirls and flowers that I had in my stash. White highlight and Crystal Stickles have been added as finishing touches.

Many thanks for taking a peek. I will be back soon.

Julie xx

Chocolate Baroque Challenge 24

Hello. Today marks the start of a brand new Colour Challenge over on the Chocolate Baroque Challenge Blog
I have created my card with the mystical Ophelia stamp. I stamped the design onto plain card and coloured with brush markers. The background was created with a ruler, brush markers and a water brush so that the colours could be blended. As usual Crystal Stickles and a white highlighter pen have been used to add highlights.


Here are the Challenge Colours so why don't you join in. For more inspiration pop over the the Challenge Blog here


Wednesday 25 May 2016

Colour Challenge 23


Hi, thanks for popping in. Today marks the start of the second week over on Chocolate Baroque's Challenge Blog and here is the colour inspiration:


Here is my card made with this months challenge colours, which I may add, is not a particular favourite of mine but then some colours are easier to work with than others.
The background is Distress inks and a stencil and the stamped flowers are from Sunny Sunflowers


Hugs

Julie xx

Thursday 12 May 2016

Woodland Tree

 Just a quick post to share a card made with the Glade Create a Tree stamp from Chocolate Baroque. Lesley will be on the Craft Channel at 5:00pm today demoing Brushos along with this stamp and lots of other fantastic stamp designs.

I started this card by making a watercolour wash for the background, before stamping the tree and leaves. Next I dabbed white Gesso all around the edge and when it was dry I sponged over Hickory Smoke Distress ink. The cracks are from one of the clear stamp egg sets, also from Chocolate Baroque.

Thanks for stopping by and hope to see you again soon.

Wednesday 20 April 2016

Colour Challenge 22


Hello and thank you for popping in. Just a quick card to share as it's the start of a brand new month over on the Chocolate Baroque Challenge blog. So why don't you have a look and join in, using these fab new colours.

Here is my little card created with the Honey Bee  set, which has been stamped with Versafine ink and water-coloured with brush markers.
I started by stamping the flower design in the middle of the card and then masked it off so that the honeycomb design could be stamped either side. I then stamped the rest of the bees and sentiments around the central design, before colouring. The card was finished off by matting onto coordinating card-stock and adding dabs of Crystal Stickles to the wings of all of the bees.

Thanks for looking and I would love it if you called back again soon.

Julie x