Wednesday 30 December 2015

Colour Challenge 18

Hello. Hope you all had a fantastic Christmas. This is probably my last blog post for this year so I will wish you all a very happy new year and hope to see you all again in 2016!
Today marks week 3 over at the Chocolate Baroque Challenge blog so you still have time to enter.
Here is the colour inspiration:


And here is my card using the Challenge colours:


I have used the Dotty Centre Flower Head stamp along with the Thank You stamp from Mackintosh sentiments.
I have stamped onto self adhesive address labels and coloured with Festive Berries Distress ink, before adding white highlights with a Zig paint pen. If you want further details you can find them over at the Chocolate Baroque Challenge blog.

Thanks for stopping by,

Julie x


Tuesday 15 December 2015

Merry Christmas

Hi ya! Like most people this time of the year I am quite busy getting ready for Christmas and sadly I have not had enough time to make new projects for my blog so I have decided to show a few festive cards that I made earlier in the year for when Chocolate Baroque released their Christmas stamps.


This card was stamped with the Welcome Home cling mounted stamp and coloured with Polychromos pencils


I love the Christmas Candle Light set that this card come from as you can build up festive backgrounds with the little holly leaf stamp


This card is a combination of Festive Candle Light and Sparkling Trees. I have built up the background from the small pine cone stamp and the central panel was stamped with the twiggy tree. All coloured with Polychromas pencils and Distress Inks


My last card is from Sparkling Trees. The background has been made with Aqua Tints and over stamped with Versafine. The decorative panel is Viva Crystal Gel that I spread onto a non stick craft sheet and when it was dry I peeled it off and coloured with alcohol inks.

Thanks for stopping by and hope to see you again soon.

Julie x

Monday 30 November 2015

Autumn Edges

Hello. As Autumn is now turning into Winter I thought it would be the perfect opportunity to post my last Autumnal themed card as a goodbye to the lovely golden leaves and hello to the cold, damp, yucky days to come.......ha ha.


The stamp set used is Autumn Edges. I inked up the naked trees with Sepia Versafine and stamped in the centre of the card and added a light blue water colour to the sky. The grass was created by dabbing a wet wipe coloured with Distress Ink to get the stipple effect. I also used this technique to colour around the edge of the card.
The leaf edges were stamped and coloured, top and bottom of the trees and then stamped onto spare card so that I could water colour before cutting them out.
The individual leaves were arranged around the trees and stuck into place with 3d glue gel. To finish off I applied Crystal Stickles to most of the leaves to create a bit of shimmer.

Thanks for stopping by.

Julie x

Wednesday 25 November 2015

Colour Challenge 17

Hello there, today is the start of the second week over at the Chocolate Baroque Challenge Blog


I really love the colour combo and have created this Steam Punk balloon card from the Punky Hearts collection


It is really simple, just stamped and water coloured and mounted onto black card. As there is a luxury gold element in the challenge colours I decided to use this as gilding flakes and applied the flakes around the edge of my design using Duo Embellishing Adhesive.
Many thanks for looking and hope to see your card in this month's Challenge.

Julie x

Tuesday 24 November 2015

Haberdashery Fan

Hi, thanks for stopping by. Just thought I would share another card from one of the recent television shows that Lesley did on The Craft Channel.

I have taken elements from 3 of the stamp sets that were featured, starting with the fan which was created with the scissors from Haberdashery. I started by stamping the scissors as close to each other as possible and kept going until I had formed a semi circle. After cutting out I scored the card so it was easier to concertina up and fold as a fan. The corner and rose are from the Lace Fragments and the Create sentiment comes courtesy of Artistic Expressions.
Many thanks for looking.

Julie x

Thursday 12 November 2015

Autumnal Edges


Hi there, thanks for stopping by. Just a quick post to share an Autumnal card made with Chocolate Baroque's Autumn Edges


I started by inking up the solid leaf border with a rainbow dye ink pad and stamping the base card as shown. On separate card I stamped the leaf, mushroom and berry borders 3 times each so that I could select which parts I wanted to cut out with my circle die.
Once cut I coloured with pencils and matched up the designs and glued into place with 3d glue gel.

Thanks for looking

Julie x

Friday 30 October 2015

Lace Fragment Union Jack


Hello! Today I have another Craft Channel show card that I have stamped with the Lace Fragments set.


This was quite a fun card to make. I searched for a union jack template on the Internet and then printed it out 3 times. I then took a craft knife to cut out sections of the flag before sponging through red and blue distress ink and then over-stamping with the lace fragments.

Many thanks for having a peek.

Julie x

Wednesday 28 October 2015

Chocolate Baroque Colour Challenge 16


Hello, today is the start of a new week over on Chocolate Baroque's Colour Challenge and these are the chosen colours, which I think are really beautiful.


 The project I have made in the challenge colours has been stamped with the Patchwork Landscape set. This card was also on the recent Craft Channel show that featured a whole host of Chocolate Baroque goodies

I stamped all of the images in Sepia Versafine and coloured with Polychromos pencils. The base card was then brushed with Broken China Distress ink, followed by a few dabs of blue and yellow acrylic paint. I finished off the base card by edging it with Pickled Raspberry Distress ink.
I added the sunrise behind the cottage by sponging distress ink through a die cut circle and added the sun rays with more distress ink against a straight edge of scrap paper. I finished the central image off by dabbing light blue acrylic paint around the edge.

Many thanks for stopping by.

Julie x

Tuesday 27 October 2015

A Little Bird Told Me......


Hello lovely people, I thought I would start showing the cards I created for the recent Chocolate Baroque television shows that Lesley did for The Craft Channel. This is the first one and has been stamped with A Little Bird Told Me set.


Sadly the picture doesn't show the clouds very well in the background, but I created these with Broken China Distress ink and stamped the little decorative stamp with grey Versafine ink. The bird and cage has been coloured with Polychromos pencils and the background on the bird panel was sponged with a wet wipe and Distress ink.
To get the bird peeking out of the panel I first cut around it's head with a pair of scissors. Then I placed  the torn edge die around the entire image and carefully lifted the birds head over the cutting edge to avoid beheading the little fella!

Many thanks for stopping by.

Julie x

Tuesday 20 October 2015

Dreaming Of The Beach


Helloooo! Thought I would post this frame design I made in memory of the summer that has just passed. The Gesso washed over the Kraft card makes it looks quite wind swept so if you visit the beach in the next few days it's probably quite realistic, however Shabby Chic was the look I was aiming for so I will let you decide......


The Beach Huts is a stamp from Chocolate Baroque and comes from the Seaside Dreams set and the sea horse which I embossed in blue, comes from the Sea Shore set.
I stamped the beach huts over the dried Gesso with a Sepia Versafine and then coloured the image with Polychromos pencils.
I recycled the old picture frame by covering it with ready mixed wall filler and strips of burlap ribbon and when it was dry, painted with a pale blue acrylic paint.

Thanks for stopping by

Julie x

Wednesday 7 October 2015

Halloween Party


Hi, just a quick post to share a last minute Halloween party idea, created using Chocolate Baroque stamps. This fantastic little set is called Put a Spell on You and I have made a place card and tag for your party bags.

The place card is just a square piece of card, but before folding in half, stamp the ghosts around the middle, then take a craft knife and cut out the top of the middle ghost and any of the other bits that will appear above the fold line. Crease and fold the card and then stamp the spider and cobweb before colouring with pencils and Distress Ink.

This little tag is designed to match the place cards and is just stamped with Black Onyx Versafine ink, coloured with a pale blue watercolour pencil and then Weathered Wood Distress ink applied over the top.

Many thanks for stopping by and hope to see you again soon

Julie x

Wednesday 30 September 2015

Chocolate Baroque - Colour Challenge 15


Hi, today is a new week on the 
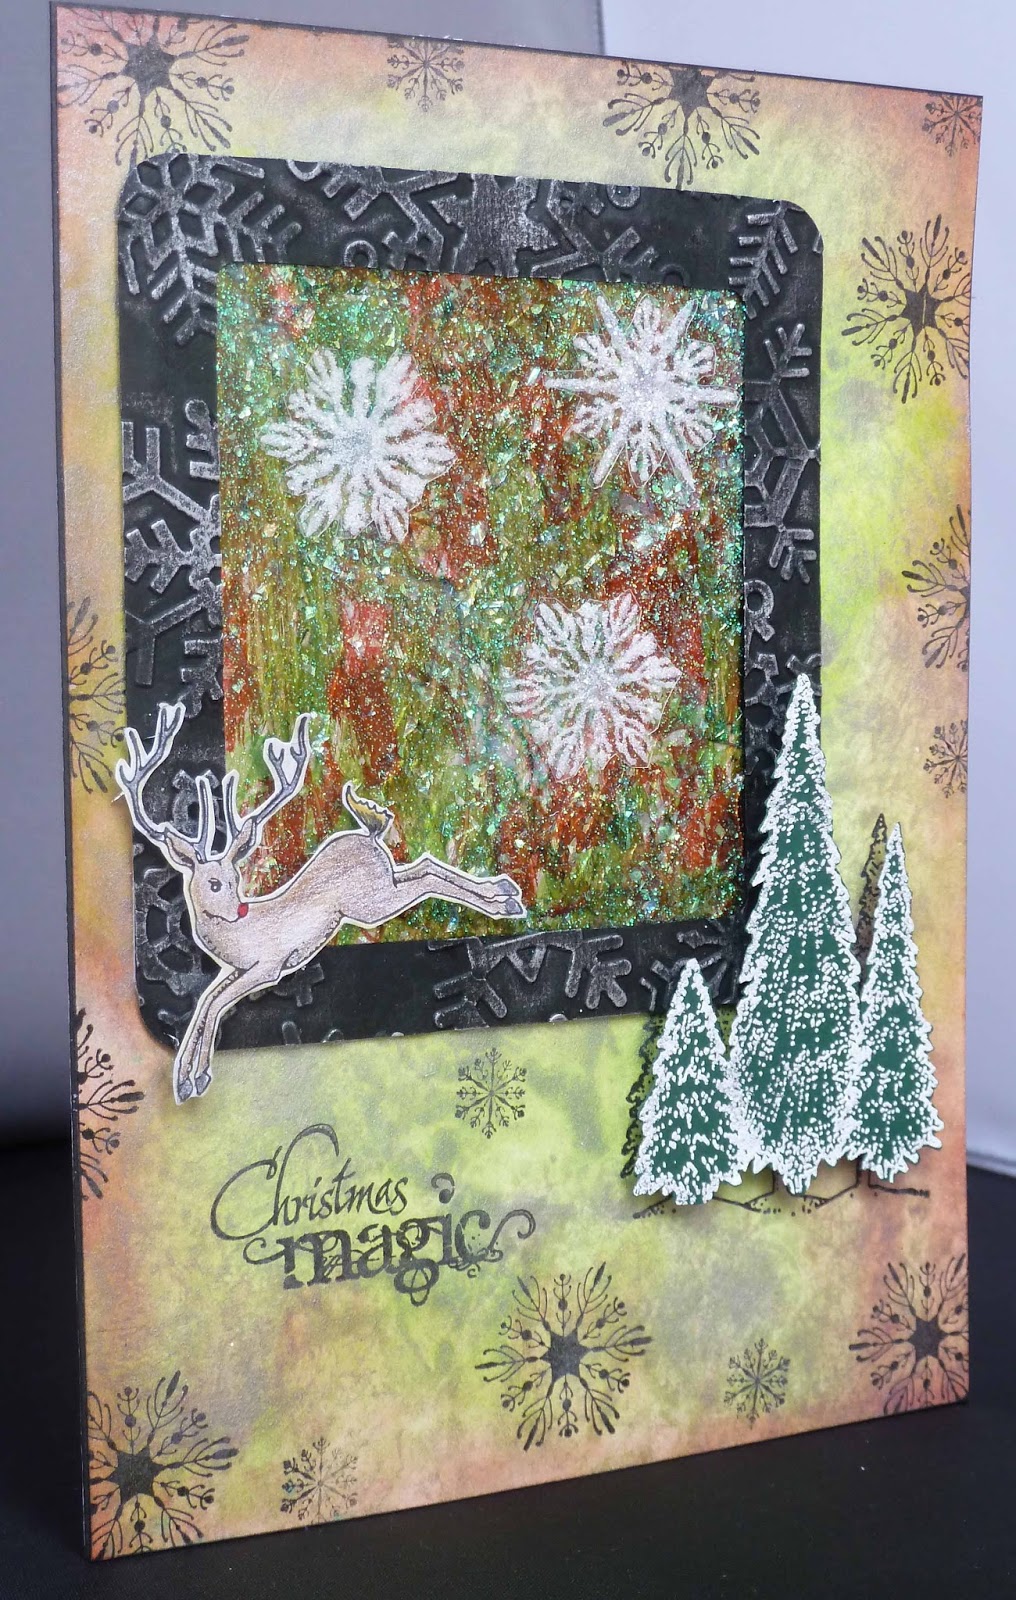
Challenge Blog over at Chocolate Baroque and here is the colour inspiration. Have to say that I really love this colour combination and hope you like the photo frame that I have altered to fit in with the challenge.

Materials:

1 smooth coated photograph frame
White stamping card
Archival Inkpad: Watering Can 
Versafine inkpads: Onyx Black and Grey
light grey coloured pencil
Black alcohol marker pen
light, medium and dark grey, alcohol marker pens
Alcohol blending solution
Felt pads
Scrap paper for masking
3d glue or foam pads


Instructions:

Cut a piece of stamping card to fit the aperture of your frame.
Ink up the tulip stamp with the Archival inkpad and stamp onto the card you have just cut. Repeat this step twice but stamp onto the scrap paper and another piece of spare stamping card.
Cut out the tulip from  the scrap paper and use this as a mask to cover your main image.
Ink up the cog stamp with grey Versafine and stamp all over the masked image.
Remove the mask and colour the cog background with a light grey alcohol marker and coloured pencil.
Colour the tulip with the yellow and grey alcohol pens and also include the image you stamped onto the spare card. 
Cut out the leaf and tulip heads from the second image and decoupage them onto the main image using 3d glue or foam pads.
Squiggle the alcohol pens all over the front of the frame and then blend with the alcohol solution that you have applied to the foam pads.
Ink up the 3 keys stamp with the Onyx Black Versafine and stamp 3 times onto stamping card. Cut out and add to the name plate on the frame.
Reassemble the frame and display.
My photo frame already had the name plate attached, but obviously any frame that has a smooth coated finish can be used.

Thanks for looking and hope to see you again soon

Julie xx

Thursday 24 September 2015

Autumn Flowers


Hi, today's post is a bit of a test to see if this publishes from my iPad so will not go into too much detail....


All stamps used are from Chocolate Baroque and I have stamped a flower texture stamp into Sculpey clay to make the decorative buttons. The main image was coloured with pencils and Distress Ink was used to stamp and colour the base card.

Thanks for stopping by.

Julie x

Friday 11 September 2015

Halloween Tags


Hello, just a quick post to show some of the fabulous new Halloween stamps from Chocolate Baroque. There are two sets to choose from, Hocus Pocus which I used to make the two small tags and Put A Spell On You for the larger tag. I used Distress ink and Polychromos pencils to colour the tags and stamped them with Onyx Black Versafine.


 Put A Spell On You

Hocus Pocus

Thanks for stopping by 

xxx

Wednesday 26 August 2015

Colour Challenge 14

Hi, today is the second week of the Colour Challenge over at Chocolate Baroque and here is the card and colour inspiration for you if you wish to join in.


Here is my card using the challenge colours. I have used the little flower background stamp from the Seasonal Fragments and the larger flowers and sentiment come from the Fresh Blooms set.


The main flower images have been coloured with Polychromos pencils. Pickled Raspberry and Peeled Paint Distress ink has been used for the background stamping and Shaded Lilac Distress ink has been brushed over to finish the background off. Not sure from the photograph if you can see the Crystal Stickles, but nothing would be complete without a few dabs of the sparkly glue....

Many thanks for looking and hope to see you again soon

xx

Sunday 9 August 2015

The Secret Gardens

Hello. Not strictly crafting, but I thought I would share a few of my pictures from when we visited the Salutation's Secret Gardens. We stopped off in Sandwich on our holiday last week which is where Steph and Dom from Gogglebox live along with their very cute Dachshund, Gigi. I was really hoping to see Gigi and as luck would have it she was in residence. She took a dislike to Ellis, our Border Collie and came rushing out to tell him off for being in her garden. If  Ellis hadn't have been with us I don't think we would have seen her.


I really am not very good on flower names so I will let you just look at the pictures..... if you can tell me what they are then please leave me a comment.


This is little Gigi, couldn't get a picture of her face...:-(


Katie, Trev and Ellis


Thanks for stopping by. 
xxx

Saturday 1 August 2015

Birthday Tweets


Hi, thanks for stopping by. Just a quick post to share this birthday card I have made for a friends little girl....hope the birds aren't too scary for her.

The bird stamps are the very familiar images from Stampers Anonymous which I coloured with Polychromos pencils. The little flower background and stamped sentiment are courtesy of Chocolate Baroque's Seasonal Fragments and A Little Bird Told Me . I cut the Happy Birthday on my Scan N Cut and to finish off I masked the centre of the card and applied Dusty Concorde Distress ink with some cut n dry foam.

Thanks for looking xx

Wednesday 15 July 2015

Colour Challenge 13 - Blog Anniversary Month


Hello, thanks for stopping by. Today is the start of Chocolate Baroques' 1st Anniversary month over on their Challenge Blog and here are the  fabulous colours for the new Challenge. Please pop over and say hello as you never know you may be the winner of a couple of planned give-aways throughout the month.


Here is my card with the new challenge colours and using the Honeysuckle Butterfly stamp set.


This is a very simple card with basic stamping that I  coloured with Spectrum Noir pencils.
The main image was stamped onto a Spellbinders die cut and mounted onto a blank die cut that I coloured with Fossilized Amber and Mowed Lawn Distress Ink. Seedless Preserve was added to the edges of the main image and the base card along with Fossilized Amber which I also used to stamp the base card.

Thanks for looking xx

Wednesday 8 July 2015

Birthday Wishes By The Beach


Hi, thanks for popping in. Today I have a card that I made for my friend's teenage daughter.


The background has been stamped with the Beach Huts from Little Claire and coloured with Spectrum Noir pencils and the mesh design is part of the Rustic Fragments set from Chocolate Baroque.
I cut the sunglasses, waves, flipflops and sentiment on my Scan N Cut and added a few dabs of crystal Stickles for good measure.

Thanks for looking xx

Sunday 5 July 2015

Water-coloured Landscape

Hello, just thought I would share a card and let you know about some give-aways that will be coming up very soon, over on the Chocolate Baroque Challenge Blog


The stamps used for this card were the Landscape Collage   , Nature Swirls andMackintosh Sentiments
The main Landscape image has been coloured with water-colour crayons and then mounted onto brown card.
The base card was spritzed with yellow Dylusions ink spray. I then stamped the large flower image from Nature Swirls and embossed in clear, before adding more Mustard Seed, Spiced Marmalade and Vintage Photo Distress ink. The clear embossed image comes through once you have given the card a quick clean with a cloth. I finished the card off by stamping a few more swirls using a brown Archival Ink followed by the sentiment from the Mackintosh clear stamp set.

This technique was inspired by one of my very talented team mates, Miranda. You can see her amazing card over on the Challenge Blog here.

Whilst you are over on the blog keep a look out for news of a couple of give-aways, as Chocolate Baroque are celebrating the Challenge Blog's first anniversary during July.

Thanks for stopping by xx

Wednesday 17 June 2015

Good morning! Today is the start of Colour Challenge 12 over on the Chocolate Baroque Challenge Blog


 Here is my card using the challenge colours. The stamps used are from the Sketchy Doodle/Landscape sets and the new Rustic Fragments and all colours are from the Distress range.
I stamped the large flower and then masked it off so that I could stamp the leaf design and make it look like it appears from behind the flower. Both stamps are from the Sketchy Doodle set. I water coloured with distress ink and added more colour over the top by colouring direct with the Distress markers. The background is a combination of two of the Rustic Fragment stamps and the corners were created stamping part of a flower design from the Landscape set, however there is a similar flower in the Doodle set so you don't really need both sets. Once I had finished stamping and colouring I brushed over some Crushed Olive and Antique Linen Distress ink.

Thanks for looking xx


Wednesday 10 June 2015

Birthday Thanks


Thanks for stopping by. Today I have the second thank you card I made my daughter, so that she could give out for some birthday money received. 
Before I started stamping I masked off sections of the card with masking tape and then stamped with various stamps from Chocolate Baroque's, Rustic Fragment stamp set and then coloured with Distress Ink.
The butterflies are Spellbinders die cuts that I have over stamped with Abstract Fragments and then glued on a random selection of seed beads using Glossy Accents.
I finished the card off with the Clarity, Thank You sentiment, stamped at various places around the card.

See you soon! xx

Monday 8 June 2015

Thank You


Hello, thanks for popping in. I have a little thank you card that I made for my daughter to give to her Aunt and Uncle after her recent birthday.
I have used a Clarity thank you stamp and one of Sheena Douglass' recent designs for the flower. I stamped the flower onto coated card and then coloured with alcohol pens. The base card was simply sprayed with purple and white spray inks and a quick pen doodle was added around the edges. There you have it, one very simple card.
Thank you for looking xx

Wednesday 27 May 2015

Happy Birthday

  Hi! Just a very quick post to share the card I made for my daughter's birthday. All of the stamps used are Sheena Douglass and have been coloured with Distress Inks and Pro markers.


Thanks for looking!

Saturday 23 May 2015

Flip Flop Birthday Wishes!

Hi crafty peeps. The card I have today  was made on my Scan N Cut and the stamps are courtesy of Sheena Douglass


This card is for a friend of my daughter's so it's designed to appeal to a teenage audience!
I started by cutting the flip flop on my Scan N Cut and then stamped and coloured the palm tree and surf board design using grey Archival ink and Pro markers. I made the easel bit of the card by drawing around the back part of the flip flop on separate card and cobbled together the easel mechanism so the card can stand up.
I also remembered to ask my daughter to write her message to her friend on the back of the shoe, before I glued it all in place!

Thanks for stopping by.

Wednesday 20 May 2015

Chocolate Baroque Colour Challenge 11

Hello, it's time for a brand new Colour Challenge over on the Chocolate Baroque Challenge blog and it is using these fabulous colours:

 My creation using this months colours is this card. The main image is the Bird Cage cling stamp and the background is stamped with one of the Harlequinn Fragment stamps.
I coloured the image with Promarkers and the background was water coloured with Distress Ink. I thought it would be a nice touch to add some beads to this card to compliment the tassels in the main design, so I used a die cut border, punched some eyelets into it before attaching jump rings. I threaded some coloured bugle beads onto some head pins, before attaching them to the jump rings.

Thanks for stopping by.

Monday 18 May 2015

Birthday Card

Hi, just thought I would add a quick post to share the card I have made for my MIL as it is her birthday tomorrow.


It is made with a mixture of Sheena Douglass' swirl stamps, Dreamee's flowers from one of their CD roms and the butterfly is from one of my Kanban stamp sets. The sentiment is computer generated.
I have added some faux stitching with a black permanent pen, lace ribbon around the sentiment and some little buttons for the corners. You can probably see some added sparkle courtesy of a Viva hologram glitter pen.
There you have it, one quick post. 
Thanks for looking.........

Friday 8 May 2015

Mannequin Collage

Hi folks, thanks for stopping by. Today's offering is a card made with the brand new stamps from Chocolate Baroque. The stamps used were the Dress Making Collage stamp and the Floral Mannequin stamp set.


  • This card measures 20 cm x 20 cm.
  • Start off by inking up the Dressmakers Collage stamp with a grey Versafine ink and then stamp all over the base card.
  • Next brush over some Antique Linen and Mustard Seed Distress ink and edge the card with a red and black Gelato crayon.
  • Cut a panel of white card measuring 11 cm x 15 cm, ink up the Collage Stamp with black Versafine and stamp all over the panel.
  • Water colour the images using Fired Brick and Forest Moss Distress Inks, then matt onto black card.
  • Cut the main panel from card measuring 10 cm x 14.5 cm and mat onto black card. Now working with the Floral Mannequin set, ink up the tailors stand with black Versafine and stamp twice.
  • Ink up the lace flower with grey Versafine and stamp over and around the tailors stands. Edge the panel with a gold Gelato crayon and brush Antique Linen Distress ink over the entire panel.
  • On separate card ink up the two floral mannequins with Versamark and stamp and emboss with black embossing powder. After heating the powder water colour with Forest Moss and Fired Brick Distress Ink. Cut these out and mount over the two stands using silicone glue.
  • You now have two panels. Place these on the card and decide where you want to stamp the lace ribbon stamps. Ideally they need to look as though they are disappearing under the panels. Use black Versafine to stamp the lace ribbons.
  • On separate card stamp the lace flower three times, brush with Mustard Seed Distress ink and then cut out. 
  • Layer up two of the cut flowers using silicone glue and then from the third flower, just cut the centre part and add to your layerd flower. Add a touch of Fired Brick Distress ink to the leaves.
  • Stick your panels to the card with double sided tape and then finish off by attaching your lace flower with silicone glue.
  • As you can see I have rounded all of the corners. I did this with a Crop a Dile Corner Chomper but of course this is completley optional.
Well if you are still with me after that you need a medal. Thanks for popping by and see you again soon...

Monday 4 May 2015

Box of Daffodils

 Good morning blog people. Today I have an up-cycled chocolate box that I have stamped using the lovely Spring Bird Daffodil and Spring Bird Tulip stamp sets from Chocolate Baroque
If you would like further details on how this box was decorated you can find them here.
Thanks for clicking by, I will be back soon with another make.

Saturday 2 May 2015

Punky Canvas

Hi, over the next few days I will be showing some of my makes that have appeared on the Chocolate Baroque design team blog but I haven't got around to posting here. This first one is a canvas created with the fabulous Punky Hearts and Fluttering Heart  stamp sets from Chocolate baroque.
You can find some more details here if you are interested in how this was put together.

Thanks for looking :-)