Wednesday, 11 January 2017

Gelli Print Romance

Hello there, just a quicky... This is a card I made for Lesley's recent show on Hochanda featuring some lovely romantic, floral stamps.


The base card is Peacock Feathers and Picked Raspberry Distress inks sponged through a dotty stencil and then the little heart from The Words of Love  stamped randomly around the design. The sentiment also comes from this set. I then took the lovely Belle Flower background stamp, some turquoise acrylic paint and a gelli plate to take prints of the positive and negative of the stamp design. I then die cut the hearts and sentiment background from my gelli prints and mounted onto the base card. 

Thanks for popping in

Julie xx

Saturday, 7 January 2017

Harlequin Heart

Hello, happy new year and thanks for popping in as I have an upcycled photo frame to show you. I have used the Harlequin Rose stamp set from Chocolate Baroque which I made especially for Lesley's debut shows on Hochanda.


I started by painting the frame with yellow and green acrylic paint and once dry I added gold gilding wax over the top. To add to the aged look I dabbed specs of black acrylic paint around the frame and smudged them with a cloth.

The heart is made from polymer clay. I rolled out some plain white clay, inked up the heart with black Versafine and stamped into the clay. Carfully remove the stamp, cut out with a craft knife and bake according to packet instructions. Before baking place tiny rolls of silver foil underneath the parts of the heart you want to be raised up.

The background has been stamped with the tassel border stamp and coloured with Distress inks.

Thanks for looking

Julie xx

Thursday, 29 December 2016

Butterfly Dreams


Hello, thanks for popping in, hope you all had an enjoyable Christmas. Today I have two Clean And Simple cards created with the Butterfly Dreams set. They are being featured on the Design Team blog along with some of my other Teamies fantastic creations so why don't you hop over and have a look.


The Butterfly Dreams  set is beautiful and the detail in the stamp means that you don't have to spend time colouring if you don't want to. These two cards really are so simple and super quick, if you need a card in a hurry this really is the go to set.


I have just inked up the stamps with two different inks ( Majestic Blue and Spanish Moss Versafine) and simply stamped onto the card...I don't think any other explanation is needed as its that easy lol!

Thanks for stopping by and hope to see you in the New Year.

Happy New Year

Julie xx

Thursday, 22 December 2016

Merry Christmas

Hello, thanks for popping in. This is a super quick Christmas card that I made using a Poinsettia stamp that I have had for years which I think came from Hobby Art and the snowy background is a clear stamp that came with one of the Christmas Creative Stamping magazine.


I started by die cutting a circle and used it as a mask so that I could apply Picket Fence Distress ink around its edge. I then removed the mask and then stamped and coloured the Poinsettia and then stamped the snowy background stamp around the edge of the circle. I finished the card off with some Merry Christmas washi tape. 
This card was really quick to make so was great for last minute cards.

I hope you all have a very happy Christmas and best wishes for a fantastic New Year.

Thanks for stopping by

Julie xx

Wednesday, 21 December 2016

Challenge 30

  • Hi! Today marks the start of a brand new colour challenge over on Chocolate Baroque's Challenge Blog


Here is my card made with the new Challenge colours along with using the rather fab Diamante Delights stamp set. I inked up the little thistle design with the darker pink ink and stamped all around the outside edge of the card. I then over stamped it with the lighter pink colour. 
I applied Shabby Shutters Distress ink in the centre of the card and used the edge of a piece of card as a guide to create the straight edge design. I then stamped one of the larger flower designs onto water-colour card and water coloured with brush-markers, then cut it out and mounted onto the base card with foam pads.


Thanks for stopping by

Julie xx

Sunday, 11 December 2016

Baroque Bracelet With Matching Gift Box

Hi, thanks for popping by. Today I am sharing a bracelet I made from a wooden lolly stick and a matching gift box.


I stamped directly onto the lolly stick (or tongue depressor) with the Baroque Orchid stamp that I had inked with green Staz-on. Next you need to place your stamped sticks into boiling water for 5 to 10 minutes and then turn the heat off and leave them to soak for a further 30 minutes. Remove the sticks and bend them into shape. Place them into a jar, or something similar to hold their shape as they need to dry for about 24 hours.
When dried, punch a hole in each end of the lolly stick with a crop-o-dile, apply gold gilding wax to the edges and then cover the entire bracelet with a coat of acrylic wax. Once dry, thread some beads onto cord and attach to the bracelet by threading through your pre punched holes and tie securely.

The box has been coloured with Distress inks and stamped with the Baroque Orchid which I had inked with green Staz-on as before. Once dry, assemble the box, apply gold gilding wax to the edges and finish off with some ribbon. I cut this box on my Scan N Cut, but you can easily make a two piece box that you created on a score board.

Thanks for looking

Julie xx

Saturday, 3 December 2016

Faux Candles


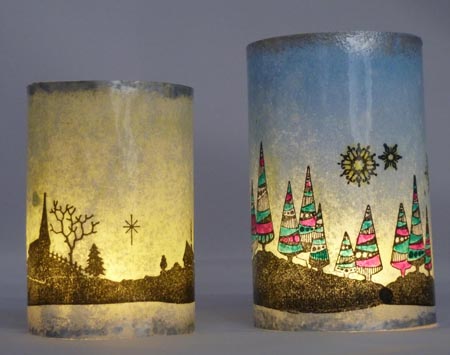
Hello, Christmas is fast approaching so if you need a quick handmade decoration here is an idea that doesn't take very long to make. It is made with Chocolate Baroque's Winter Edges.


So the first picture shows the candles without being lit and the second with an added tea light.
Stamp your chosen design along the bottom of a piece of copier paper using Onyx Black Versafine and cut to the desired height of your candle. The trees have been coloured with brush markers and I used Pan pastels in blues, greys and yellows for the backgrounds. Remove excess Panpastel with a tissue before covering with Versafine ink, or any other clear embossing ink, before then adding clear embossing powder and heating with a heat gun. If you haven't got a nice smooth finish then repeat the embossing process for a second time.


Cut a piece of acetate to the same size as your copier paper, fold the cut acetate to form a cylinder and staple into place. Wrap your candle design around the acetate and secure with double sided tape. Finish the edges of the candle with silver Distress paint and then place over a lit battery operated tea light.

Thanks for popping in and hope to see you again soon

Julie xx


Wednesday, 30 November 2016

Walled Garden


Hello, me again. Just a quick post to share another couple of cards that have appeared on Chocolate Baroque's Design Team blog.


My first card is created with the Walled Garden cling stamp. I simply stamped the image with Black Onyx Vesafine and then water coloured with brush markers. There is a little bonus tree stamp that comes with this design, so I stamped it through the archway so it looks like the path leads to another garden.


This card has been created with Another Brick in the Walled Garden and as before I water coloured with brush markers. I decided to reflect the wall element of the design and mounted the image onto a stencilled wall. There is a little bonus foliage stamp that comes with this stamp, so I added it around the stencilled wall and finished off with dabs of Crystal Stickles.

Thursday, 24 November 2016

Autumn Heart


Hello. I have a cute little tag made with Chocolate Baroque's Woodland Edges to show you today.


I coloured the tag with Distress inks before stamping the solid row of leaves 3 or 4 times on a slight angle. Next I cut a heart and it's shadow on the Scan n Cut before stamping the heart with the naked, winter tree. The heart topper was coloured with Distress inks and finished off with white pen highlights.
3 little die cut leaves were added with 3D foam and I finished the tag off with some beaded string, tied in a bow.

Thanks for stopping by.

Julie xx

Wednesday, 23 November 2016

Chocolate Baroque Challenge 29

Hi there, it is week 2 over on the Chocolate Baroque Challenge blog, so why don't you enter, still plenty of time and there is a chance of a prize as always.


As you can see the Challenge colours have been kept very Autumnal, so I decided to go with a simple leaf design taken from the Butterfly Dreams set. I coloured directly onto the stamp with brush markers and pressed onto the card. I started by making a border around the edge of the card and then moved to the centre to fill in a smaller square area. Once the leaves were all stamped I added touches of Old Paper and Walnut Stain Distress ink before mounting the sentiment and adding it to the centre of the card.


Thanks for stopping by. Hope to see you again soon.

Julie xx

Friday, 18 November 2016

Butterfly Frame

Hello there! I have neglected my poor blog for a while but have decided to start posting my Chocolate Baroque Design Team projects. Usually I just post them on the Design Team blog, however I have had a look through some of my projects and thought they would brighten up my little ole blog...lol


I made this frame over a year ago, but it's a really quick and easy present idea. The picture frame was painted with Gesso and then dry brushed with cerise pink acrylic paint. The main image is a background stamp from Chocolate Baroque that I have stamped 4 times to build up a bigger design. The butterflies are again CB stamps that I coloured with Peacock Feather and Picked Raspberry Distress ink and added a glittered flame around the edge.

Thanks for popping in

Julie xx

Thursday, 17 November 2016

Autumn

Hello, just a quick post to share a card I recently posted on Chocolate Baroque's blog.


The card is stamped with the Fantasy Woodland set, which is becoming one of my all time favourites from CB. The centre tree was stamped with brush markers painted directly onto the stamp and the leaves around the design were stamped with Distress ink, along with the swirly detail, which is actually another tree from the same set.

Thanks for stopping by

Julie xx