Thursday, 28 December 2017

Quick Cards


Hi there, thanks for popping in. Here is a very quick post to share a couple of quick cards.


My first card is stamped using the Lily set from Chocolate Baroque. As you can see a very simple stamp the design and colour with pencils kind of design. The background has been coloured with Antique Linen Distress ink.


My second card is stamped with a design from Chocolate Baroque's Breath of Spring and the sentiment is from Birthday Words.

A big thank you for taking the time to stop by. Hope you have had a wonderful Christmas and sending best wishes for a fantastic 2018

Julie xx

Wednesday, 29 November 2017

Steampunk of Days Gone By

 Hi there, thanks for popping in.
Thought I would pop this frame card and matching box onto my blog.
It is made with Steampunkery and Steampunk Travel which are all stamps from Chocolate Baroque.


The box and card frame were both cut on my Scan n Cut and I decorated them both before gluing them together.
The winged clock also comes from the stamp sets, however I used it to stamp into Fimo clay. I cut out the clay with a craft knife before baking and then spraying with alcohol ink. I added wire and beads from my stash instead of cutting out the fiddly propeller that was in the original design.

Thanks for taking a peek.

Julie xx

Saturday, 18 November 2017

Steampunk

Hello, thanks for stopping by. My poor blog has been neglected again so to try and make up for my tardiness I have posted 3 cards to try to make amends.  All of these cards were made for a recent Chocolate Baroque show on Hochanda, did you get to see it?


My first card is stamped with Chocolate Baroque's Steampunkery  and Eccentric Edwardian . All of the images have been stamped with Onyx Black Versafine and Distress inks for the background. The larger clock face was stamped onto acetate and the reverse was covered in bronze glitter glue. To finish off I added Glossy Accents to the Beetle's body clock.


This second card has been stamped with Steampunkery, as before and the background is Distress inks. To finish off I have added acrylic paint dots and white paint pen highlights.


My last card is stamped with Steampunkery and Eccentric Edwardian as before and the sentiment is from Punky Expressions.

Thanks for taking a peek

Julie xx

Tuesday, 24 October 2017

Trees and Leaves


Hello, thanks for popping in. Today I have a trio of cards that I have recently made for Chocolate Baroque's TV shows on Hochanda.
My first card is stamped with  Fantasy Woodland and coloured with Polychromus pencils. I have to confess that I did get some help with an Inkadinkadoo Stamping Gear to create the circular design in the centre, but I am sure if you have an eye for detail you could give it a go free hand. 


This second card is stamped with the Tall Trees set, coloured with Distress inks and finished off with white paint pen highlights.


My third card is stamped with a set from Chocolate Baroque's Autumn Beauty collection. As you can see I decided to just highlight the golden leaves and colour the rest in grey tones.


Thanks for taking a peek.
See you soon

Julie xx

Wednesday, 11 October 2017

Reindeer Landscape

Hello, thought I would show another Christmas card...sorry if it's too early :-D


The base card has been coloured with Distress inks before being over-stamped with the trees and snow flakes. The reindeer panel was stamped with Onyx Black Versafine before being coloured with Polychromus pencils. Dabs of crystal stickles and white paint pen have been added for extra sparkle and there you have it, one Christmas card made using the Reindeer Landscape set.

Thanks for stopping by

Julie xx

Sunday, 8 October 2017

Autumn Leaves

Hiya, just popping in to show a quick Chocolate Baroque stamped card.

The sets I have used for this card are Nature's Peace and Nature Table.
First I took some water colour card and covered it in yellow and orange liquid watercolour. I let it dry before stamping the trees and leaves with Versamark before applying clear embossing powder and  setting with a heat gun. Once you are happy with your stamped design, spritz the card with lots of water and blot with kitchen towel. This tones down the background colour but leaves the deeper colour tone under the clear embossing ink.
Cut your image into 3 panels, mount onto card-stock before attaching to the front of your card blank. Stamp the sentiment, cut out and attach to the front.
I have finished off the design with 3 die cut leaves that I have brushed with gilding wax.

Thanks for taking a peek

Julie xx

Wednesday, 13 September 2017

Autumn Leaves

Hello, sorry it has been so long since my last post. My mojo has decided to up and leave making crafting very difficult, so to keep my little blog ticking over I have posted 3 cards that I made a while ago, but you may have seen one or two of them featured on Chocolate Baroque's recent Hochanda show.


All three of these cards are made with the rather fabby Autumn Edges stamp set.


As you can see it is a very versatile set so if you fancy getting stuck into some seasonal makes then you need this set.


Thanks for stopping by

Hugs

Julie xx

Sunday, 20 August 2017

Leafy Flower


Hellooo, thanks for stopping by. Just a quick post to show you the card I made with Chocolate Baroque's Take it or Leaf it stamp set.


I coloured the base card with Spiced Marmalade, Squeezed Lemonade and Mustard Seed Distress inks and stamped around the edge with the small swirly leaf stamp. I then used an Inkadinkadoo Stamping Gear to position the small decorative leaf around the centre of the card blank. I then stamped the same small leaf design onto spare stamping card 16 times before colouring with Distress inks and then cutting out. I used 3d glue gel to attach the leaves to the front of the card and finished off with white paint pen highlights and dabs of Crystal Stickles.

Many thanks for taking a peek

Julie xx

Tuesday, 15 August 2017

Quick Cards

Hello, thanks for popping in. Today I have a quick card idea made with the Hanging Flowers stamp courtesy of Chocolate Baroque.


I simply stamped and embossed the flowers onto Kraft card, before die cutting with a circle.
I added some colour using a damp brush and liquid water-colour, before mounting onto black card that I had again cut using a circle die.
The card was finished off with a sentiment from Amazing Mackintosh Words.

If you would like some more quick card inspiration then pop over to the Chocolate Baroque Design Team blog for more ideas for when you need a card in a hurry.

Hope to see you again soon

Julie xx

Monday, 7 August 2017

Colouring Pages


Hi thanks for popping in. Just thought I would post a couple of pages that I coloured for Chocolate Baroque's recent Hochanda show.


I have coloured these with Magic Colouring Pencils. I really loved playing with these as there are 2 or 3 different colours in each pencil, depending on how you hold it and the blender pencil works a treat.


You can find the colouring pages over at Chocolate Baroque and they come with a really useful colour mixing guide and a colour wheel as well.

Hope to see you again soon

Julie xx

Friday, 21 July 2017

Mackintosh Cards


Hiya, thanks for taking a peek. I have two cards to share today that I made for a recent Chocolate Baroque TV show. 


My first is made with the Mackintosh Beauty set. I decided to use the ribbon rose as a corner stamp along with framing the central heart design. No difficult measuring was necessary as you just stamp the ribbon rose and then turn 90 degrees and stamp again, just make sure that the ribbon is as close as it can be to the image already stamped. The heart design fits perfectly in the middle. I have coloured the card with brush markers and Distress inks.


I started my second card by stamping the border from Mackintosh Beauty to make a frame for the central panel. To make a neater finish use masking tape to mitre the corners so you do not get any overlap from where the border images meet at the corners. The central panel is from Mackintosh Windows. I stamped this onto separate card before colouring with Polychromos pencils and then cutting out. The birthday wishes sentiment is from Amazing Mackintosh Words and the background was created by swiping the edge of Old Paper Distress ink across the page.

Hope to see you again soon

Julie xx

Sunday, 9 July 2017

Summer


Hi, just popping in to share a card created with the Summer Fayre stamp from Chocolate Baroque.


The base card was stamped with the Large Crackle Background stamp and the poppy is from Pretty Poppies.
I stamped the lady onto Kraft card and coloured with pencils, edged the design with the Crackle background and added crystal stickles and white paint pen highlights. No other techniques have really been used other than stamp and then colour.

Thanks for looking

Julie xx

Thursday, 29 June 2017

More Butterflies...

Hi there, thanks for popping in. These are the last of my butterfly cards created for a recent Chocolate Baroque, Hochanda TV show.


This first card was made with Butterfly Blush and Patchwork Butterfly stamp sets.
I started by stencilling the grey splodges onto stamping card and then inked up the butterflies with various dye inks. Before stamping the butterflies I inked up the swirly grass from Patchwork Butterfly with red Versafine and stamped onto the butterflies before stamping onto the card. A technique called Kiss Stamping. I finished the card off with a sentiment from Patchwork Butterfly.


My second card was made by placing butterfly and dragon fly masks (from Kaleidoscope of Butterflies)onto card stock and applying Distress ink over the top. I then stamped the butterfly and dragon fly from Butterfly Blush in the space left from the mask. The butterfly in the centre is from Just Butterflies and has been stamped onto acetate and glittered on the reverse side before being glued to the front of the card with 3d glue gel.

Thanks for looking

Julie xx

Friday, 16 June 2017

Butterflies


Hello, thank you for stopping by. Just sharing a couple of cards I made for one of Lesley's shows that was shown on Hochanda.


My first card is created with the Patchwork Butterfly set, using the resist technique. I stamped and then heat embossed all of the images with white embossing powder and then went over the top with Distress inks.


My second card is stamped with two sets, Butterfly Blush and Just Butterflies. The background is just a baby wipe dipped into Distress ink and then dabbed over the card. I then inked up the Just Butterflies with blue Versafine ink and then over stamped them with the matching butterfly from the Butterfly Blush set using Distress inks.

Many thanks for stopping by

Julie xx

Wednesday, 7 June 2017

Very Last Colour Challenge...

Hello, thanks for stopping by. Today marks the start of the 3rd week of the very final Colour Challenge over on Chocolate Baroque's Challenge Blog. You still have time to enter so why don't you hop across and have a go because as always there is a chance of a prize.


My canvas using the challenge colours, has been created with the Patchwork Butterfly set that was recently featured on Hochanda. You may have caught a glimpse of my canvas in the background if you watched the show.

To start with I painted the entire background with a green acrylic paint, then once dry I coated the surface with cheap PVA glue. Just as the glue is starting to dry paint on some white Gesso and leave to dry. The cracks will start to appear as the PVA and Gesso dry.
The large butterfly has been stamped onto acetate. I coloured the reverse side with alcohol markers, crystal lacquer and glitter.
The three smaller butterflies came from the butterfly stencil that Chocolate Baroque recently launched on Hochanda and I applied molding paste through the stencil that I had mixed with acrylic paint. Before it dried I sprinkled with Glamour Dust to add an extra sparkle.
The flourish has been stamped with various acrylic paints.


Thanks for looking and don't forget to give the very last challenge a go.

Julie xx

Saturday, 27 May 2017

Happy Birthday Katie

Hi there, thanks for popping in. Today is my daughter's 19th birthday so I decided to make a couple of things on my Scan n Cut especially for her big day.
I have to say I love my Scan N Cut and makes crafting sooo much easier.


I cut these fab shoes from Card Shapes vol 2  Tattered Lace USB and glued them onto a base that I also made on the SnC. I sponged silver paint over the shoes and covered the base in molding paste before painting with black gesso and dry brushing silver and gold acrylic paint over the top.


This rocker card is courtesy of Card Shapes vol 1 Tattered Lace USB and the bag, lipstick and nail varnish came from the Glitz and Glam USB.

Thanks for popping in and hope you all have a fab Bank Holiday weekend.

Julie xx

Monday, 15 May 2017

Magical Landscapes

Hello again, two cards to show you that I created for Lesley's Fairy television show that was recently on Hochanda. Both cards have been created with the Magical Landscapes set.


If you want to find out how I created them then please pop over to the Design Team blog, where you will find all of the details.


Thanks for stopping by

Julie xx

Quick Cards

Hello! Thanks for popping in. I have a quick 15 minute card to show you today that I created with Chocolate Baroque's May Fairy stamp set. 


For this card I started by stamping the card base with the tall decorative flower. Stamp the design at 12, 3, 6 and 9 o'clock positions first and then fill in between. It needs no measuring or stamp positioner. Next you need to take the little butterfly and stamp around the edges. Once the stamping is done, get a wet wipe and apply dabs of Cracked Pistachio  Distress ink to the background and then edge with Mustard Seed Distress ink. Finish off the design with a die cut circle, placed in the centre, that has been stamped with the little butterfly design.

If you need a quick card idea then there is plenty more inspiration over on the Chocolate Baroque Design Team blog today so be sure to take a look.

Thanks for taking a peek

Julie xx

Saturday, 6 May 2017

Birthday Shoes

Hello lovely peeps. The card I have today was made for a friend's birthday and didn't take too long to make at all.


The shoe is a Tattered Lace design and was cut on my Scan N Cut. The sentiment is also courtesy of my Scan N Cut and is one that is already in the machine's memory. The coloured scroll design is from Clarity and was inked with Distress Oxides and the corners were stamped with designs I have in my stash that I no longer have any idea where they came from so apologises.

I finished the card off with a few flat backed gems and that is pretty much it.

Thanks for stopping by and hope you have a fab weekend

Julie xx

Tuesday, 2 May 2017

All Things Russian

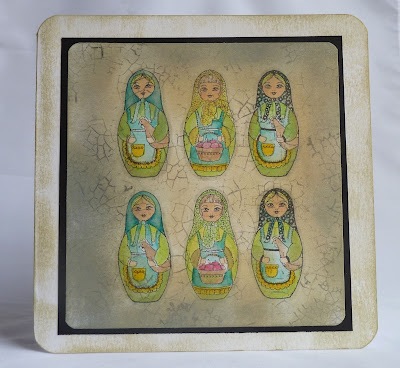
Hi, thanks for popping in. Just playing catch up with my blog posts and thought I would share these two cards that were recently shown on Lesley's Hochanda Shows where she did some fab demos with the Babushka stamps and the Silhouette Palace stencils...did you get to see it? 


This first card is created with the 3 smallest Babuska dolls, coloured with Brush Markers and the background is coloured with Antique Linen and Hickory Smoke Distress inks. I inked up the large Crackle Background stamp with grey Versafine and stamped all over the card to create an aged effect, before mounting onto black card and attaching to the card base.


This card is created with the Silhouette Palace mask and stencil. It was really easy to create. Start by placing the Palace mask onto water colour card. Mask off the bottom half of the card, add a moon with Distress ink and then mask that off before spritzing with your inks. Whatever colours you want but I have used red, orange, yellow and grey spray inks.Remove the mask and leave to dry. Next you will need to turn the mask around and place it underneath your design so that it is a reflection. Using Cut N Dry foam go around the stencil with Hickory Smoke Distress ink. Remove the mask and then add in water ripples with Hickory Smoke Distress ink and a white paint pen. Place the palace stencil over the main image and go in with Distress ink so that you can add shadow.

Thanks for popping by

Julie xx
Wednesday, 19 April 2017

Challenge 34

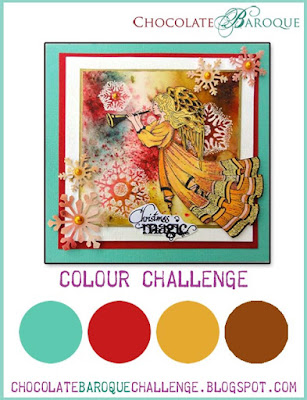
Hi there, thanks for popping in. Today marks the start of a brand new colour challenge over at Chocolate Baroque so why not have a look and give it a go. As always there is a prize up for grabs!


My Challenge entry has been stamped with the clear Thank You mandala stamp set and coloured with Polychromos pencils. I created the swirly background by spraying watercolour card with a little water and then grating Derwent Inktense blocks over the wet surface. Once the granules have started to dissolve into the cardstock, take a wet wipe and swirl the colour around. There will be a few grains of colour that have not dissolved and they will create the swirl effect.


Here is a reminder of the lovely new colours for this challenge...go on have a go!

Thanks for taking a peek

Julie xx

Monday, 10 April 2017

Happy Easter

Hello crafty peeps, thanks for stopping by. Today I have two cards created with the brand new Floral Egg stamp from Chocolate Baroque.


Both of these cards are featured on the Design Team blog today so if you would like more details on how I made them, please pop over and have a look.


Happy Easter and thanks for poppin' by!
Julie xx

Wednesday, 22 March 2017

Challenge 33

Hi, thanks for popping in. Today marks the start of the second week of Challenge 33 over on Chocolate Baroque's Challenge Blog, so you still have plenty of time to enter. As always there is a prize up for grabs so why not have a go.


Here is my card design for the current challenge. I have used stamps from Punky Hearts and Fluttering Hearts against a stencilled background which I coloured with Distress Inks. I added an extra layer to the butterfly to add some interest and finished off with dabs of Crystal Stickles and white paint pen highlights.


Thanks for looking and don't forget to pop over to the Challenge blog and have a go...

Julie xx
Saturday, 18 March 2017

Quick Cards


Hi! I have been a bit slow on the blog posting so apologies for not keeping up. As the title suggests I have a quick card that takes less than 15 minutes to create. If you like the idea of quick cards, but need some ideas then hop across to Chocolate Baroque's Design Team blog where you will find plenty of inspiration as there is a recent post dedicated to 15 minute cards. 


This cute bunny card is stamped using a silhouette stamp from Glorious Spring. I started by stamping the rabbit design with Onyx Black Versafine, then using torn paper as a guide, I created the hills with Distress ink. The sun ray is a brilliant stencil from Tim Holtz which I used with Lemonade and Mustard Seed Distress inks and there you have one super quick card, which barely took 10 minutes.

Thanks for stopping by

Julie xx

Wednesday, 8 March 2017

Challenge 32

Hello there, today I have a tag which I made for the current colour challenge that is going on over at Chocolate Baroque's Challenge Blog.


I chose to use the Key To My Dreams for this tag design. I started by covering my grey board tag with white Gesso and once dry coloured the tag with green Gelato. The key has been stamped and embossed with copper embossing powder before being cut out and painted with green and copper mica powders. The sentiment and lock design have been stamped with Antique Bronze Distress Paint which  I also added around the outside edge of the tag.

I punched a hole in the top of the key, threaded through some ribbon and mounted onto the tag using foam pads. I finished off the tag by threading it with ribbon and cord.


There is still time to join in with this challenge and win a prize so why not give it a go?

Thanks for looking

Julie xx

Thursday, 16 February 2017

Quick Cards


Hello Bloggers, today I have a quick post to share two quick cards that I made for Lesley's Chocolate Baroque, Hochanda TV shows.


My first card is made with the Baroque Meadow. I simply coloured the stamp with green and lilac brush marker pens and then stamped onto card-stock. Don't worry about the ink drying before you are ready to stamp as you just need to give your stamp a good huff of your breath to reactivate the ink. After layering with black card-stock I finished off the design with Crystal Stickles. Very simple but very effective at the same time.


My second card is just as simple. I cut 3 hearts using a die cut and used the left over piece as a stencil which I applied lilac Distress ink through. I stamped two of the die cut hearts with the bubble stamp from Sticks and Stones using a green Distress ink. I continued with the bubble stamp around the outside edge of the card, alternating with lilac and green Distress inks and finished off with a sentiment stamped on each of the stencilled hearts from Words to Dazzle and Sparkle .

If you would like more quick card inspiration then why not pop across to Chocolate Baroque's Design Team blog where there are plenty more ideas being featured today.

Thanks for popping in

Julie xx

Wednesday, 15 February 2017

Kingfisher Song

Hello, just thought I would add these two cards that have recently been featured over on Chocolate Baroque's Design Team Blog. They have been created with Kingfisher Song, Silhouette Grasses and Sticks and Stones stamp sets. They are all brand new stamp sets that have been featured on Hochanda TV and demoed by Lesley from Chocolate Baroque.


If you would like more info as to how I created these two cards, then you can pop over to the Design Team blog, where I explain in more detail.


Thanks for taking a peek,

Julie xx

Wednesday, 25 January 2017

Colour Challenge 31

Well hello! It's the second week of our current Colour Challenge over on Chocolate Baroque's, Challenge Blog, so there is still plenty of time to have a look and get your entry in because as always there is a prize for the winner.


This is my card using the Challenge Colours as illustrated below. I have used a stamp from Exquisite Edges and water coloured it with brush markers. For the background I sponged Distress inks before applying lots of water and then leaving to dry naturally.
To finish the design off I added a sentiment from Mackintosh Sentiments


Many thanks for taking a peek and hope to see you again soon.

Julie xx